

If you need to install Office 21019 or greater then you need to get the Office deployment tool, if you try to install off the ISO you will get a "retail" version of Office that will need to be activated via a product key.
In this example we want a KMS server activation which means you need a KMS host key installed on a KMS servers and then you need to use the initial key "General Volume Licensing key" or GVLK to get this working and activated.
⚒️ Required Tools
This will require two tools outlined below, with the links required:
- Office Deployment Tool - https://www.microsoft.com/en-us/download/details.aspx?id=49117
- Office Customisation Tool - https://config.office.com/deploymentsettings
- KMS Host Server
🤖 Download Office deployment tool
When you download the "Office Deployment Tool" you will then need an XML file to make it work which needs to added to the setup.exe command, once downloaded this will give you a setup.exe
🤨 Restrain from running the executable immediately!
If you just run the setup.exe then you will get an error saying that it cannot install Office as you have not given a XML file that will configure this install.....

🚧 Obtain your XML configuration
So, we need to visit the other link from above to get to the Office Customisation Tool and for this example we require Office 2019 with a KMS host setup so from that website you will need to answer all the question including:
- Architecture Type (x32 or x64)
- Product Type (Office Version)
- Additional product types like Visio, Project and ironically Skype
- Update Channel required
- Office version updates
- Optional for Office components (per application like Word, Excel, PowerPoint, Outlook, OneDrive)
- Primary Language
- Optional : Secondary Languages
- Deployment Location
- Update Location
- Accept Terms and Conditions and Licensing
- Product Key Settings (KMS, MAK)
- Product Activation (User, Device, Shared)
- Company Name (for registration)
- Optional : Office Customisation
Once filled all this out, click the export button:

Finally you will asked about the file extensions, I will honour the Office Open XML formats here.

Finally you will asked about the file extensions, I will honour the Office Open XML formats here.
You then need to give the profile a name (which will be an XML file) and then agree to the terms and conditions then click export as below:

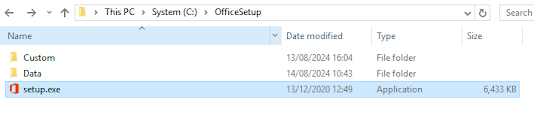
⬇️ Locate your executable and XML in the same folder
When you click export this will download the XML file and that will need to be moved to the location where you have setup.exe from the previous download as below:

The contents of this file are as follows:
The contents of this file are as follows:
<Configuration ID="c13a9506-73a8-4371-9e5f-fc1a46f261fa">
<Add OfficeClientEdition="64" Channel="PerpetualVL2019" SourcePath="c:\Office" AllowCdnFallback="FALSE">
<Product ID="ProPlus2019Volume" PIDKEY="NMMKJ-6RK4F-KMJVX-8D9MJ-6MWKP">
<Language ID="en-gb" />
<ExcludeApp ID="Groove" />
<ExcludeApp ID="Lync" />
</Product>
</Add>
<Property Name="SharedComputerLicensing" Value="0" />
<Property Name="FORCEAPPSHUTDOWN" Value="TRUE" />
<Property Name="DeviceBasedLicensing" Value="0" />
<Property Name="SCLCacheOverride" Value="0" />
<Property Name="AUTOACTIVATE" Value="1" />
<Updates Enabled="TRUE" />
<RemoveMSI />
<AppSettings>
<Setup Name="Company" Value="Bears are Awesome" />
<User Key="software\microsoft\office\16.0\excel\options" Name="defaultformat" Value="51" Type="REG_DWORD" App="excel16" Id="L_SaveExcelfilesas" />
<User Key="software\microsoft\office\16.0\powerpoint\options" Name="defaultformat" Value="27" Type="REG_DWORD" App="ppt16" Id="L_SavePowerPointfilesas" />
<User Key="software\microsoft\office\16.0\word\options" Name="defaultformat" Value="" Type="REG_SZ" App="word16" Id="L_SaveWordfilesas" />
</AppSettings>
</Configuration>
This configuration file will configure Office 2019 in KMS mode and store those files in the location of C:\Office for this example. with some custom options, that was generated from the "office customisation tool" website.
💀 Commands to download/configure
We now have our XML file so now we need to run the setup.exe with the configuration file referenced and we need two commands here one for the download and one for the configure as below:
setup.exe /download office2019-configuration.xml
setup.exe /download office2019-configuration.xml
setup.exe /configure office2019-configuration.xml
⬇️ Download office data & configuration
⬇️ Download office data & configuration
If you run this command:
setup.exe /download office2019-configuration.xml
After a short pause, the folder C:\Office should be created and the contents should be downloaded to that folder like this, wait for this to download, the command will exit when complete.

🌈 Install Office suite and applications
setup.exe /download office2019-configuration.xml
After a short pause, the folder C:\Office should be created and the contents should be downloaded to that folder like this, wait for this to download, the command will exit when complete.
🌈 Install Office suite and applications
Now we need to configure or "install" Office 2019 so run this command:
setup.exe /configure office2019-configuration.xml
When you run that command the event log is the place to check for updates here, you need the Application event log, the command will appear to have "hung" but do not worry its working away in the background and the first signs of life all is well is this event:

That will say "Offline downlevel migration succeeded"
When you see this event within a couple of seconds you should then see this event:

That will read "Beginning a Windows Installer transaction: c:\program files (x86)\microsoft office\root\integration\c2rint.16.msi. Client Process Id: 8648"
👀 Confirm Office is now installed
setup.exe /configure office2019-configuration.xml
When you run that command the event log is the place to check for updates here, you need the Application event log, the command will appear to have "hung" but do not worry its working away in the background and the first signs of life all is well is this event:
That will say "Offline downlevel migration succeeded"
When you see this event within a couple of seconds you should then see this event:
That will read "Beginning a Windows Installer transaction: c:\program files (x86)\microsoft office\root\integration\c2rint.16.msi. Client Process Id: 8648"
👀 Confirm Office is now installed
Once the setup exits then if you check the Start Menu you should now see the "Office Applications" and that means setup.exe has done its job, below you can see Excel, OneDrive, Excel, Outlook and OneNote.....

🤖 Check for product activation
🤖 Check for product activation
We now need to launch any Office applications to ensure it has been activated, if you open Excel and then start a "new workbook" then click on File and Account you should see this:

If you did not put the GVLK key in the configuration file you may get this error to say its not activated:

🚧 Office failed to activate?
If you did not put the GVLK key in the configuration file you may get this error to say its not activated:
If so click on "Change Product Key" and provide the GVLK key which is "NMMKJ-6RK4F-KMJVX-8D9MJ-6MWKP" then click on "Activate Office"

If you have a KMS server that is published to Active Directory then all is good, you Office should activate.
If you have a KMS server that is published to Active Directory then all is good, you Office should activate.
☹️ KMS host not published to Active Directory?
Exception, however if you KMS server is not published to Active Directory you have a couple more steps to complete to get this working, for this you will need to start a command prompt in elevated mode then issue this command:
cd C:\Program Files (x86)\Microsoft Office\Office16
cd C:\Program Files (x86)\Microsoft Office\Office16
Then you need to set the KMS servers and activate your product with these commands:
cscript ospp.vbs /sethst:officekms.bear.local
cscript ospp.vbs /setprt:1688
cscript ospp.vbs /act
That should look like this , you should not get error in the commands and it should end with "Activation Successful"

This means you have now activated Office 2019 with your KMS server and all is well, unless that is, you didn’t even get that far.
cscript ospp.vbs /sethst:officekms.bear.local
cscript ospp.vbs /setprt:1688
cscript ospp.vbs /act
That should look like this , you should not get error in the commands and it should end with "Activation Successful"
This means you have now activated Office 2019 with your KMS server and all is well, unless that is, you didn’t even get that far.
❌ Office deployment and proxy servers
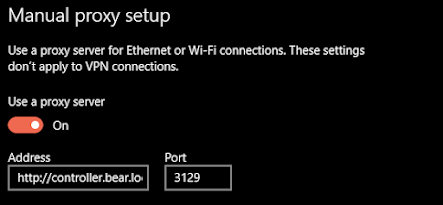
If you are in a corporate domain there is a chance you will need to use a proxy server to get the internet that means you have no direct internet access without using a proxy, that means you computer is offline (from the Inters point of view) without a proxy server and you will get this:

That's simple then all I need to do is set a proxy like this then, so I can use the Internet and try again:
Yes, indeed, but nope that does not work, you will get the same error and you will also get the same error is you give variables to the command prompt like this:
✋ Logical diagnostics, failing
That's simple then all I need to do is set a proxy like this then, so I can use the Internet and try again:
Yes, indeed, but nope that does not work, you will get the same error and you will also get the same error is you give variables to the command prompt like this:
set HTTP_PROXY=http://controller.bear.local:3129
set HTTPS_PROXY=https://controller.bear.local:3129
You can also try to use netsh (which is not recommended) with the command:
netsh winhttp set proxy controller.bear.local:3129
🌎 Where is my Internet?
This is crazy, I have internet access but I cannot download the Office files, what is this voodoo, well the cause is you are using your local account not the account the installer uses which is "system" that account will not have a proxy set.
🤿 Diving into the logs
To figure this out we need to look at some log files and those files are located in the path:
%localappdata%/temp
When here you are looking for the file called the name of your workstation then the date and its a log file, you may need to clear this down with a delete as I had loads of "rubbish" in here:
 If you look for the text unexpected you will see data like this over and over.......
08/14/2024 11:44:18.083 SETUP (0xa4c) 0x24c4 Click-To-Run c7qn1 Unexpected Transport::Connect {"MachineId": "d4ddb635df576441942ae74b02568948", "SessionID": "37b3cbb2-581c-4c50-ac78-c767402b63b9", "GeoID": 242, "Ver": "0.0.0.0", "C2RClientVer": "16.0.13426.20352", "ErrorCode": 30183, "ErrorType": "HttpTransportError", "AppVErrorSource": "", "ErrorMessage": "HttpTransportError (Http GET request failed , Error:0x190)", "ErrorDetails": "", "ContextData": "{\"message\":\"Failed to connect\"}"}
This means this application is using my account but more another account on the computer and that got we wondering is the account being used "system" and not mine?
%localappdata%/temp
When here you are looking for the file called the name of your workstation then the date and its a log file, you may need to clear this down with a delete as I had loads of "rubbish" in here:
08/14/2024 11:44:18.083 SETUP (0xa4c) 0x24c4 Click-To-Run c7qn1 Unexpected Transport::Connect {"MachineId": "d4ddb635df576441942ae74b02568948", "SessionID": "37b3cbb2-581c-4c50-ac78-c767402b63b9", "GeoID": 242, "Ver": "0.0.0.0", "C2RClientVer": "16.0.13426.20352", "ErrorCode": 30183, "ErrorType": "HttpTransportError", "AppVErrorSource": "", "ErrorMessage": "HttpTransportError (Http GET request failed , Error:0x190)", "ErrorDetails": "", "ContextData": "{\"message\":\"Failed to connect\"}"}
This means this application is using my account but more another account on the computer and that got we wondering is the account being used "system" and not mine?
Well this Microsoft post for proxy scenarios reckons so.
🪝 System account & Internet linkage for successful download
🪝 System account & Internet linkage for successful download
Now we know why this is failing, so lets get psexec from SysInternals you can get that from the URL https://download.sysinternals.com/files/PSTools.zip
Download this file and place it in a folder then start an elevated command prompt and naviagte to this folder, then you need this command to run it as "system"
Note : Ensure Internet Explorer is closed before you can issue that command, it will be used later on!
PsExec.exe -s -i cmd.exe
Note : Ensure Internet Explorer is closed before you can issue that command, it will be used later on!
PsExec.exe -s -i cmd.exe
Then in that command prompt use the command:
whoami
The response should be:
nt authority/system
This is shown below:

Then in that command window enter this command:
“C:\program files\Internet Explorer\iexplore.exe”
This will start Internet Explorer as system, then see if you can navigate to https://office.com - my guess is no, and that is where you problem is the system account cannot access to the internet.
whoami
The response should be:
nt authority/system
This is shown below:
Then in that command window enter this command:
“C:\program files\Internet Explorer\iexplore.exe”
This will start Internet Explorer as system, then see if you can navigate to https://office.com - my guess is no, and that is where you problem is the system account cannot access to the internet.
🥵 I do not want SYSTEM using the internet?
Good point, for this run the "download" portion on a device that can natively use the internet and have the download to a network share this is the XML I have created with smb-office2019.xml:

Then the contents of this XML specify the SMB share name, that is in bold in the XML file.
Then the contents of this XML specify the SMB share name, that is in bold in the XML file.
Note : Ensure the SMB share name is valid and it has write access as required else you will not be able to download data
Warning : on the SMB share path ensure you end it with a trailing slash “/“
<Configuration ID="33c858bb-5505-4be4-9725-0a3d9908ed76">
<Add OfficeClientEdition="32" Channel="PerpetualVL2019" SourcePath="\\smbshare.bear.local\Office2019\" AllowCdnFallback="TRUE">
<Product ID="Standard2019Volume" PIDKEY="6NWWJ-YQWMR-QKGCB-6TMB3-9D9HK">
<Language ID="en-gb" />
<ExcludeApp ID="Groove" />
</Product>
</Add>
<Property Name="SharedComputerLicensing" Value="0" />
<Property Name="FORCEAPPSHUTDOWN" Value="TRUE" />
<Property Name="DeviceBasedLicensing" Value="0" />
<Property Name="SCLCacheOverride" Value="0" />
<Property Name="AUTOACTIVATE" Value="1" />
<Updates Enabled="TRUE" />
<RemoveMSI />
<AppSettings>
<Setup Name="Company" Value="Bears are Awesome" />
<User Key="software\microsoft\office\16.0\excel\options" Name="defaultformat" Value="51" Type="REG_DWORD" App="excel16" Id="L_SaveExcelfilesas" />
<User Key="software\microsoft\office\16.0\powerpoint\options" Name="defaultformat" Value="27" Type="REG_DWORD" App="ppt16" Id="L_SavePowerPointfilesas" />
<User Key="software\microsoft\office\16.0\word\options" Name="defaultformat" Value="" Type="REG_SZ" App="word16" Id="L_SaveWordfilesas" />
</AppSettings>
<Display Level="Full" AcceptEULA="TRUE" />
</Configuration>
You could call that XML the filename "smb-office2019.xml" then to install from the network share use this command:
You could call that XML the filename "smb-office2019.xml" then to install from the network share use this command:
setup.exe /configure smb-office2019.xml